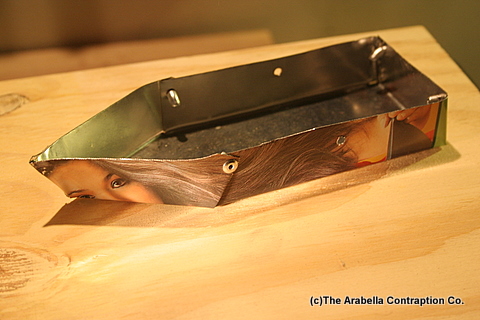
 First stage:a plan of a boat is drawn on paper,cut out,put
on a piece of sheet metal and secured with tape.
Then with the metal snips I cut out the outline of the boat.
The holes for the drive shaft were drilled
First stage:a plan of a boat is drawn on paper,cut out,put
on a piece of sheet metal and secured with tape.
Then with the metal snips I cut out the outline of the boat.
The holes for the drive shaft were drilled
 Second stage:the sheet metal is folded along the lines with a
few rivets to keep it together.A small torch was used to solder
it together more and make it watertight.I tested if
no water entered the boat.Usually it's not a good idea to mix
that with electronics......
Second stage:the sheet metal is folded along the lines with a
few rivets to keep it together.A small torch was used to solder
it together more and make it watertight.I tested if
no water entered the boat.Usually it's not a good idea to mix
that with electronics......
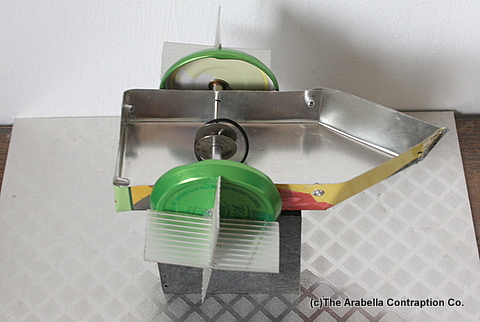 Third stage:the waterwheels are made out of jar lids and pieces
of aluminium.A metal spool is glued onto the shaft for the
drive belt.
The drive belt is put on the shaft,then the waterwheels were
glued onto the shaft with e6000.
Third stage:the waterwheels are made out of jar lids and pieces
of aluminium.A metal spool is glued onto the shaft for the
drive belt.
The drive belt is put on the shaft,then the waterwheels were
glued onto the shaft with e6000.
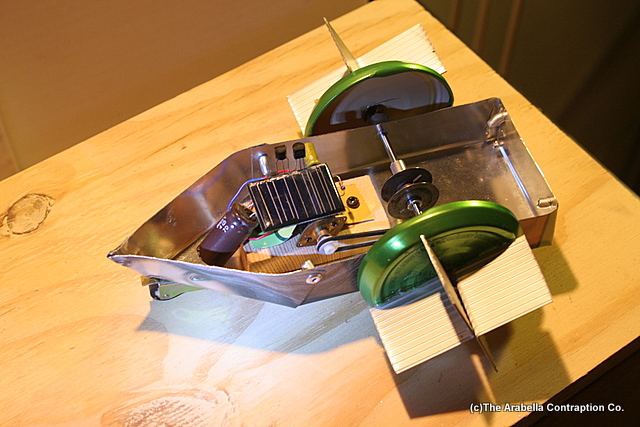 Fourth stage:the Miller solarengine and
the motor are attached.I tested various
motors
but settled for a gear motor
in the end.The other ones were not
strong enough.
I also attached a small wheel under the bow.
Fourth stage:the Miller solarengine and
the motor are attached.I tested various
motors
but settled for a gear motor
in the end.The other ones were not
strong enough.
I also attached a small wheel under the bow.
After some tests I found out that the concept does work,but is not very efficient. I probably need a bigger solar cell and a different belt system:a toothed one seems a better option.On to Version 2!